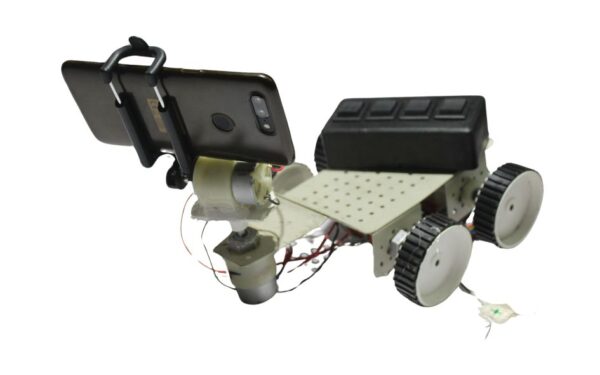

Cam Based Robot working model
ROBOTIC LAB EQUIPMENT WORKING MODEL / ROBOTIC EXHIBITION WORKING MODEL / ROBOTIC WORKING MODEL
4 in stock
Refund
Unfortunately, once an order is placed, there is no refund available. However, we do offer exchanges for defective or damaged items.
Due to the nature of our products and the potential for misuse or mishandling, we do not offer refunds. We believe in customer satisfaction and strive to provide quality exchanges for any issues that may arise.
If you have received a defective or damaged item, please contact our customer service team and they will assist you with the exchange process. Please note that exchanges are subject to availability and product conditions.
We do not offer refunds for change of mind purchases, but we do offer exchanges for valid reasons such as defects or damages.
Delivery
My Science Kart delivers orders through a reliable and efficient shipping service to ensure your products arrive safely and on time.
Yes, you can easily track your order from My Science Kart by using the tracking number provided to you once your order has been shipped.
If you have any issues with your order from My Science Kart, please contact our customer service team who will be happy to assist you and resolve any problems.
Payment
You can pay for your purchases on My Science Kart using various payment methods such as credit/debit cards, net banking, UPI’s and mobile wallets.
Yes, we use industry-standard encryption technology to protect your payment information and ensure that it is secure.
If you have any payment-related queries or issues on My Science Kart, you can contact our customer support team through the website or email us at support@mysciencekart.com.
Cam Based Robot working model
Building a cam-based robot working model can be a fascinating project for students, allowing them to explore mechanical design, motion control, and basic robotics principles. Below is a step-by-step guide to creating a basic cam-based robot model:
**Materials Needed:**
1. Cardboard or foam board for the chassis
2. DC motors and motor drivers
3. Wheels or tracks for mobility
4. Camshaft or cam mechanism
5. Pushrods or linkages
6. Microcontroller (Arduino or Raspberry Pi)
7. Battery pack
8. Various tools (scissors, cutter, ruler, etc.)
9. Glue, tape, screws, and fasteners
**Steps:**
**1. Design the Chassis:**
– Sketch out the design of the robot’s chassis on cardboard or foam board. Consider the size and shape based on the components you plan to incorporate.
– Cut out the chassis pieces and assemble them to form the robot’s body using glue or tape.
**2. Install the Motors and Mobility System:**
– Attach DC motors to the chassis using screws or adhesive, ensuring proper alignment.
– Mount wheels or tracks onto the motors to provide mobility for the robot.
**3. Design the Cam Mechanism:**
– Sketch out the design of the camshaft or cam mechanism, which will generate motion for the robot.
– Determine the desired motion pattern (e.g., linear, oscillating) and design the cam profile accordingly.
**4. Attach Pushrods or Linkages:**
– Connect pushrods or linkages between the camshaft and the robot’s moving parts (e.g., wheels).
– Ensure that the pushrods are securely attached and allow for smooth movement as the cam rotates.
**5. Wire and Connect Electronics:**
– Wire the DC motors to motor drivers and connect them to the microcontroller for control.
– Connect any additional sensors or components required for the robot’s operation, such as obstacle detection sensors or LEDs.
**6. Program the Microcontroller:**
– Write code to control the robot’s movement based on the camshaft’s rotation.
– Use Arduino IDE or Python for Raspberry Pi to program the microcontroller.
– Implement algorithms to translate the cam’s motion into commands for the motors.
**7. Test and Refine:**
– Test the robot in a controlled environment to ensure that it moves according to the desired motion pattern.
– Fine-tune the cam profile or adjust the linkage connections as needed to improve performance.
– Conduct trial runs to verify that the robot operates smoothly and reliably.
**8. Demonstration and Presentation:**
– Showcase the cam-based robot to students, teachers, or parents, demonstrating its motion and functionality.
– Explain the design and mechanics of the cam mechanism, highlighting the STEM principles involved in its construction.
– Encourage students to discuss the robot’s operation and potential applications in different scenarios.
Building a cam-based robot model provides students with hands-on experience in mechanical engineering, motion control, and robotics, fostering creativity, problem-solving skills, and STEM literacy. It offers an engaging educational opportunity to learn about mechanisms and their applications in real-world systems.
Precision Motion Control
Innovative Cam Mechanism for Fluid Movements Discover the precision and efficiency of the Cam Based Robot Working Model, a pivotal tool in robotics and mechanical engineering education. This model uses a cam mechanism, typically used in modern machinery for translating rotational motion into linear motion, to demonstrate complex mechanical principles in a tangible and interactive way.
Educational and Professional Tool
Explore Advanced Mechanical Concepts The Cam Based Robot is not just a teaching aid but a robust educational tool that helps students and professionals alike understand the workings of cam mechanisms used in various applications like automated machinery and robotics. It features adjustable cams to change motion outputs and is an excellent resource for hands-on learning and experimentation.
Why Choose Our Cam Robot?
A Step Towards Advanced Robotics Opting for our Cam Based Robot Working Model means choosing a pathway to advanced mechanical understanding. It is designed to give users a deep dive into the practical applications of cams in automated systems, enhancing both theoretical knowledge and practical skills in mechanical design and robotics.
| Weight | 2 kg |
|---|---|
| Dimensions | 40 × 25 × 30 cm |
You must be logged in to post a review.
Q & A
Related Products
REFLECTION OF LIGHT PLANE MIRRORS/LAWS OF REFLECTION WORKING MODEL
- ✓ 100% Quality products
TEMPERATURE AND RESISTANCE WORKING MODEL
- ✓ 100% Quality products
OPTICAL BENCH FOR CONVEX LENS FOR MEASURING OBJECT AND IMAGE DISTANCE WORKING MODEL
- ✓ 100% Quality products
AC ELECTRIC GENERATOR WORKING MODEL
- ✓ 100% Quality products
HEAT, TEMPERATURE and KINETIC ENERGY WORKING MODEL
- ✓ 100% Quality products
OERSTED EXPERIMENT WORKING MODEL
- ✓ 100% Quality products
LIGHT RAY TRAVELS FROM A DENSER MEDIUM TO RARER MEDIUM WORKING MODEL
- ✓ 100% Quality products
OPTICAL BENCH FOR CONCAVE MIRROR /or OPTICAL BENCH FOR MEASURING OBJECT AND IMAGE DISTANCE BY USING CONCAVE MIRROR WORKING MODEL
- ✓ 100% Quality products
Product categories
- Circuits & Projects 233
- My Science Kart 665
- Raw Materials For Projects & Lab Equipments 381
- Science Exhibition 516
- Science Exhibition Projects & Working Models 344
- Biology Science Exhibition Projects & Working Models 31
- Chemistry Science Exhibition Projects & Working Models 12
- Mathematics Science Exhibition projects & Working Models 7
- Physics Science Exhibition Projects & Working Models 129
- Robotics Science Exhibition Projects & Working Models 23
- Social Science Exhibition Projects & Working Models 20
- Science Lab Equipments With Working Models 363
Cart
TRULY INDIAN EDUCATION BRAND
Over 10,000+ Happy Customers
My Science Kart
Address:- Ground floor, Lakshmi Nagar, D.No:- 40-1/1-5, PVP Mall Backside, Mogalrajapuram, Labbipet, Vijayawada, Andhra Pradesh 520010
7673977997, 0866-3543677
mysciencekart@gmail.com
Categories
MAP
© My Science Kart 2024, Designed & Developed By Synfocy Tech Solutions


Reviews
There are no reviews yet